更新记录
1.0.0(2023-11-06) 下载此版本
1.0.0 (2023-11-03)
- 首个 uni-app 插件版本。接口及示例程序见百家云官方网站。
平台兼容性
| Android | Android CPU类型 | iOS |
|---|---|---|
| 适用版本区间:6.0 - 12.0 | armeabi-v7a:支持,arm64-v8a:支持,x86:未测试 | 适用版本区间:11 - 16 |
原生插件通用使用流程:
- 购买插件,选择该插件绑定的项目。
- 在HBuilderX里找到项目,在manifest的app原生插件配置中勾选模块,如需要填写参数则参考插件作者的文档添加。
- 根据插件作者的提供的文档开发代码,在代码中引用插件,调用插件功能。
- 打包自定义基座,选择插件,得到自定义基座,然后运行时选择自定义基座,进行log输出测试。
- 开发完毕后正式云打包
付费原生插件目前不支持离线打包。
Android 离线打包原生插件另见文档 https://nativesupport.dcloud.net.cn/NativePlugin/offline_package/android
iOS 离线打包原生插件另见文档 https://nativesupport.dcloud.net.cn/NativePlugin/offline_package/ios
注意事项:使用HBuilderX2.7.14以下版本,如果同一插件且同一appid下购买并绑定了多个包名,提交云打包界面提示包名绑定不一致时,需要在HBuilderX项目中manifest.json->“App原生插件配置”->”云端插件“列表中删除该插件重新选择
BRTC uni-app 插件
1. 插件配置
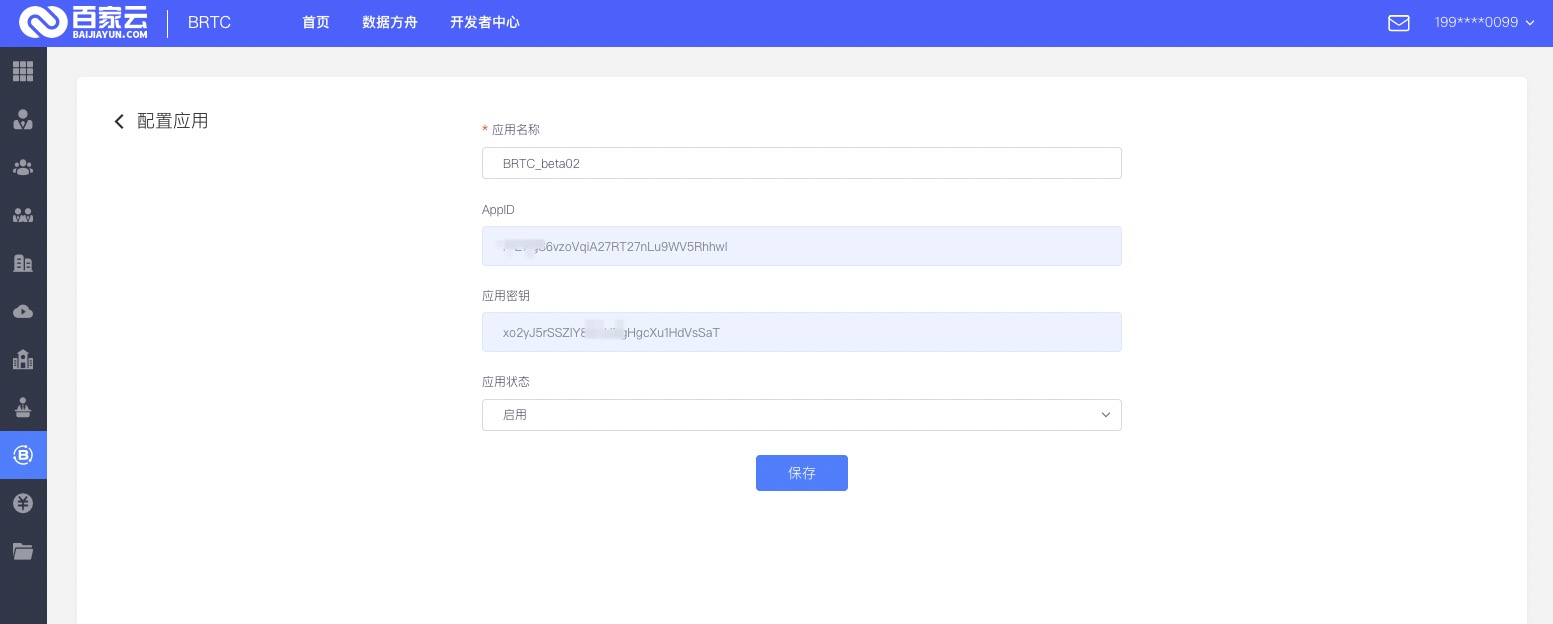
1.1. 创建应用,获取 AppID
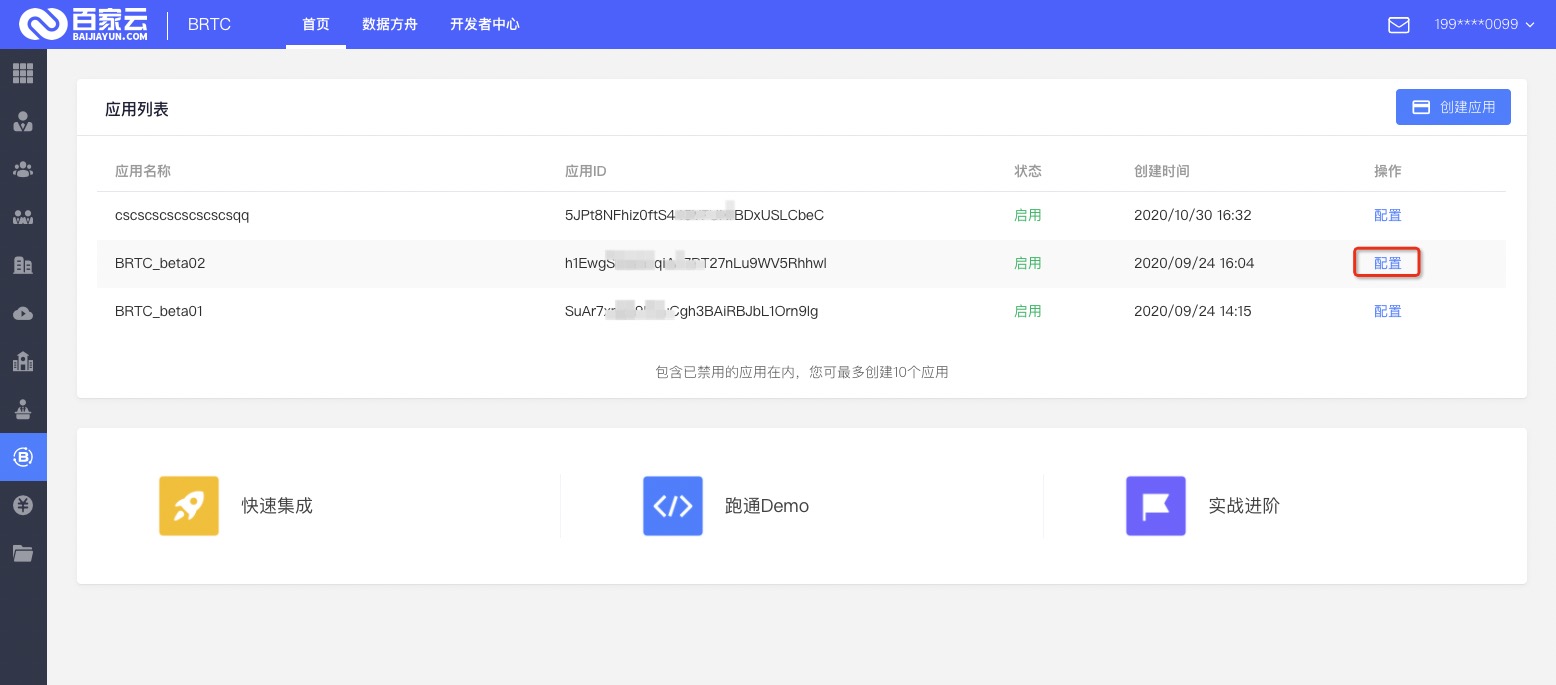
登录百家云后台,进入 BRTC 频道,点击对应的 App 相关的配置信息,即可以获取对应 App 的应用密钥(key)和 AppID。


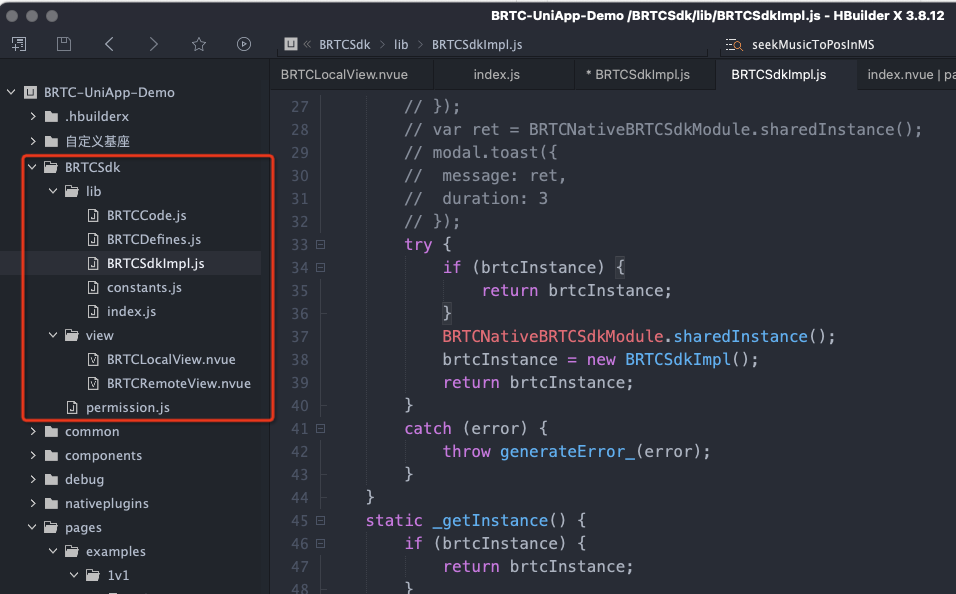
1.2. 导入 JS 封装层代码
HBuilder X 云端依赖插件后,可以从 demo 示例代码工程中获取到 JS 封装层代码。demo 示例代码的获取和运行方式见百家云 BRTC 官方文档。
将 JS 封装层代码放入到工程根目录下,具体如下图:

1.3. 示例代码
请移步至百家云 BRTC 官方文档 获取
2. API 常用接口介绍
2.1. API 完整文档
2.2. 注意事项
插件是 uni-app 原生插件,使用前请了解 uni-app 原生插件使用方法,官方教程:uni 原生插件使用教程
使用视频功能时,页面必须使用 .nvue 文件构建。因为扩展的 component 只能在 .nvue 文件中使用,不需要引入即可直接使用。目前的插件中包含扩展 component,用来显示视频流。详情可参考
2.3. 初始化
import BRTCSdk from '@/BRTCSdk/lib/index';

this.brtcInstance = BRTCSdk.createInstance();
2.4. 进入房间
import { BRTCRoleType } from '@/BRTCSdk/lib/BRTCDefines';

// 组装 BRTC 进房参数,请将 BRTCParams 中的各字段都替换成您自己的参数
const params = {
  sdkAppId: "xxxxxxxx";     // Please replace with your own sdkAppId
  userId: "123456";         // Please replace with your own userid
  roomId: "123456";         // Please replace with your own room number
  userSig: "xxxxxx";        // Please replace with your own userSig
};
this.brtcInstance.enterRoom(param);
2.5. 开启预览
<template>
  <div>
    <view class="brtc-video-view" id='root'>
      <brtcLocalView :viewId="userId" style="height: 403.84rpx;flex: 1;"></brtcLocalView>
    </view>
  </div>
</template>

<script>
  import BRTCLocalView from '@/BRTCSdk/view/BRTCLocalView';
  import BRTCSdk from '@/BRTCSdk/lib/index';

  export default {
    components: {
      brtcLocalView: BRTCLocalView,
    },
    data() {
      return {
        brtcInstance: BRTCSdk.createInstance(),
        userId: '123456'
      }
    },
    methods: {
      startLocalPreview() {
        // 需要在登入房间之后才能开启视频通话
        const isFrontCamera = true;
        this.brtcInstance.startLocalPreview(this.isFrontCamera, this.userId);
      }
    }
  }
</script>
2.6. 拉取其他用户音视频
<template>
  <div>
    <view class="brtc-video-view" id='root'>
      <brtcRemoteView v-if="remoteUserId" :userId="remoteUserId" :viewId="remoteUserId" style="height: 403.84rpx;flex: 1"></brtcRemoteView>
    </view>
  </div>
</template>

<script>
  import BRTCLocalView from '@/BRTCSdk/view/BRTCLocalView';
  import BRTCSdk from '@/BRTCSdk/lib/index';
  import { BRTCVideoStreamType } from '@/BRTCSdk/lib/BRTCDefines';

  export default {
    components: {
      brtcRemoteView: BRTCRemoteView,
    },
    data() {
      return {
        brtcInstance: BRTCSdk.createInstance(),
        remoteUserId: '123456'
      }
    },
    methods: {
      startRemoteView() {
        // 拉取远端音视频
        this.brtcInstance.startRemoteView(this.remoteUserId, BRTCVideoStreamType.BRTCVideoStreamTypeBig, this.remoteUserId);
      }
    }
  }
</script>
2.7. 退出房间
exitRoom() {
  try {
    this.stopLocalPreview();
    this.stopRemoteView();
    this.stopLocalAudio();
    this.brtcInstance.exitRoom();
  } catch (e) {
    // TODO handle the exception
  }
},
2.8. 销毁实例
destroyInstance() {
  if (this.brtcInstance) {
    this.handleUninstallEvents();
    BRTCSdk.destroyInstance();
    this.brtcInstance = null;
  }
}
2.9. 监听事件
2.9.1. 进房事件
this.brtcInstance.on("onEnterRoom", (result) => {
  if (result > 0) {
    console.log(`进房成功,耗时: ${result}ms`);
  }
});
2.9.2. 退房事件
this.brtcInstance.on("onExitRoom", (reason) => {
  console.log(`退房 ${reason}`);
});
2.9.3. 远端用户加入事件
this.brtcInstance.on("onRemoteUserEnterRoom", (userId) => {
  console.log(`远端进房: userId = ${userId}`);
});
2.9.4. 远端用户离开事件
this.brtcInstance.on("onRemoteUserLeaveRoom", (userId) => {
  console.log(`远端离房: userId = ${userId}. reason = ${reason}`);
});
2.9.5. 远端用户发布视频事件
this.brtcInstance.on("onUserVideoAvailable", (res) => {
  console.log('onUserAudioAvailable = ', res);
});
2.9.5. 远端用户发布音频事件
this.brtcInstance.on("onUserAudioAvailable", (res) => {
  const { userId, available } = res;
  if (userId && available) {
    this.remoteUserId = userId;
  }
});
更多的事件请参考官网开发者文档中心,或示例代码。


 收藏人数:
收藏人数:
 购买(
购买( 下载 for 离线打包
 赞赏(0)
赞赏(0)
 下载 310
 赞赏 0
赞赏 0

 下载 10005


 赞赏 0
赞赏 0


 赞赏
赞赏

 京公网安备:11010802035340号